Oracle的云服务较之国内有很多便利,也没那么多套路,但新上手还是有很多不顺之处。
1.OracleCloud创建的主机,是不能自己配置公网IP的,也看不到绑定公网IP的网卡,只能看到一块ens3的默认网卡,绑定的是内网IP。
[root@instance-heiry ~]# [root@instance-heiry ~]# ifconfig -a
ens3: flags=4163<UP,BROADCAST,RUNNING,MULTICAST> mtu 9000
inet 10.0.0.86 netmask 255.255.255.0 broadcast 10.0.0.255
inet6 fe80::17ff:fe00:7ee5 prefixlen 64 scopeid 0x20<link>
ether 02:00:17:00:7e:e5 txqueuelen 1000 (Ethernet)
RX packets 42717 bytes 79644892 (75.9 MiB)
RX errors 0 dropped 0 overruns 0 frame 0
TX packets 39782 bytes 17319192 (16.5 MiB)
TX errors 0 dropped 0 overruns 0 carrier 0 collisions 0
2.默认以opc+key登录,root被禁用,每次SSH之后都要sudo -i 才能执行相应操作,非常麻烦,需要手动更改:
Changing password for user root.
sudo -i
sudo passwd root
Changing password for user root.
New password:
sudo -i
sudo passwd root
Changing password for user root.
New password:
#打开PasswordAuthentication及 PermitRootLogin功能
PasswordAuthentication yes
#打开PasswordAuthentication及 PermitRootLogin功能
vim /etc/ssh/sshd_config
#把值设为yes,去掉注释
PasswordAuthentication yes
PermitRootLogin yes
#重启SSH服务
service sshd restart
#打开PasswordAuthentication及 PermitRootLogin功能
vim /etc/ssh/sshd_config
#把值设为yes,去掉注释
PasswordAuthentication yes
PermitRootLogin yes
#重启SSH服务
service sshd restart
3.默认有security list 控制入站规则,除了在服务器设定开放端口外, security list 也需要设置Ingress Rules才能访问。
4.使用ubuntu 系统默认装 iptables-persistent,需要手动设置。centOS8下安装mysql8.0,出现莫名其妙的问题, security list开放了3306访问,服务器防火墙也开启了3306,mysql服务器权限都设置了,但是在启用服务器防火墙情况下,始终无法远程访问mysql服务器,如关闭,则可以访问。即使mysqld服务占用的3306/33060端口都开放,监听了所有IP,仍然无法访问。
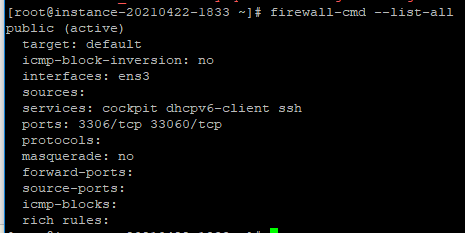


发现3306端口只是在TCP6下监听,于是将
vim /etc/mysql/my.cnf
#加上参数
bind-address = 0.0.0.0
vim /etc/mysql/my.cnf
#加上参数
bind-address = 0.0.0.0
设置IPv4转发状态
sysctl net.ipv4.ip_forward
vim /etc/sysctl.conf
#添加以下参数
net.ipv4.ip_forward = 1
sysctl net.ipv4.ip_forward
vim /etc/sysctl.conf
#添加以下参数
net.ipv4.ip_forward = 1
发现,3306转到tcp下监听,可是打开防火墙,远程依然是被blocked状态。