腾讯行为验证码QQcaptcha提供免费版的API(支持不大于2000次/小时的请求),依靠腾讯强大的云计算平台和大数据处理能力,QQcaptcha稳定性、可靠性属上乘,是中小应用安全验证的不错选择(介绍详见:http://www.mosang.net/575.html)。

接入也不复杂,以下为接入教程(PHP版):
1. 打开链接 https://007.qq.com/captcha/ 登录申请。
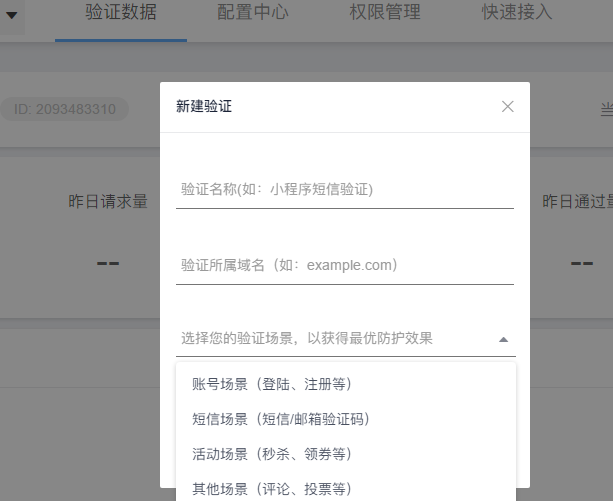
2. 绑定域名,新建验证码。可以需要选择应用场景(登录验证、秒杀、抽奖等)
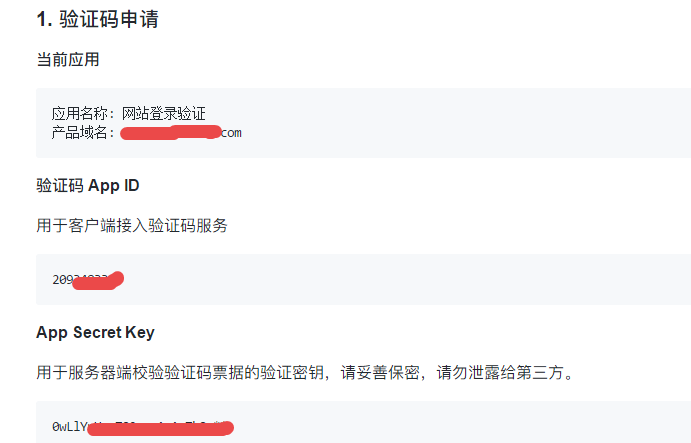
3.成功后即可获得APP ID及App Secret Key。
4. 客户端接入:
a.引入JavaScript文件,在<head>区域引入JavaScript脚本:
<script src="https://ssl.captcha.qq.com/TCaptcha.js"></script>
b. 创建激活DOM对象(通过ID指定,默认为click事件触发)
<!--点击此元素会自动激活验证码-->
<!--id : 元素的id(必须)-->
<!--data-appid : AppID(必须)-->
<!--data-cbfn : 回调函数名(必须)-->
<!--data-biz-state : 业务自定义透传参数(可选)-->
<button id="TencentCaptcha"
        data-appid="8888888" <!--这里"8888888"换成你自己的APP ID-->
        data-cbfn="callback"
>点击认证</button>
c.为验证码创建回调函数(函数名与上一步data-cbfn指定的相同)
window.callback = function(res){
    console.log(res)

    // res(用户主动关闭验证码)= {ret: 2, ticket: null}
    // res(验证成功) = {ret: 0, ticket: "String", randstr: "String"}
    if(res.ret === 0){
        alert(res.ticket)   // 票据
    }
}
上面是官方给出的示例,实际应用代码参考如下:
window.callback = function(res){
    if(res.ret === 0){
    $.post("http://www.mosang.net/isallowlogin.php",//异步发送ticket和randstr到服务端
      {
      ticket:res.ticket,
      randstr:res.randstr
      },
      function(data,status){
      if(data.allowLogin == "yes"){
        alert("防恶意行为认证成功");
      }
      else
      {
        alert("防恶意行为认证失败");
      };
      });
    }
}
5. 服务器端验证程序isallowlogin.php,向腾讯服务器发送GET请求,具体参数参照官方给出列表:
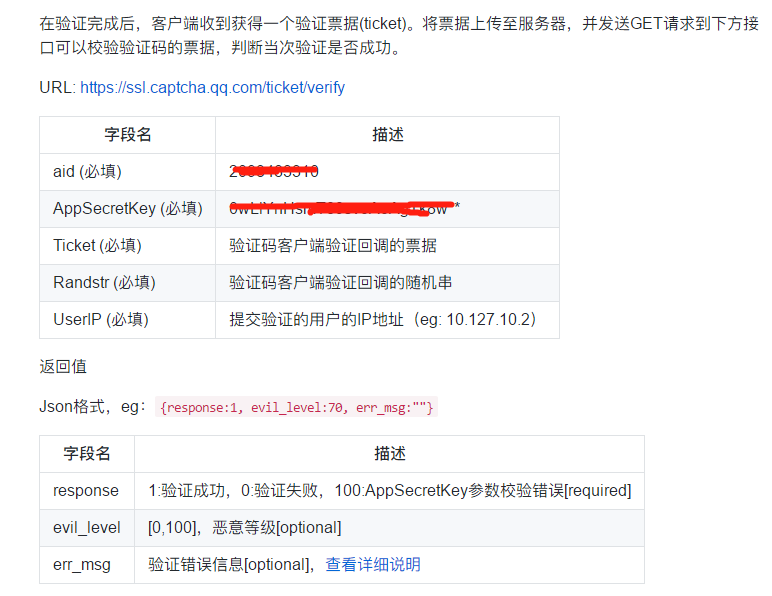
isallowlogin.php请求及返回数据参考如下:
<?php
$ip = $_SERVER['REMOTE_ADDR'];
$ticket = $_POST["ticket"];
$randstr = $_POST["randstr"];
$tagetUrl='https://ssl.captcha.qq.com/ticket/verify?aid=888888&AppSecretKey=0wLlYnHsmrfrfrfr&Ticket='.$ticket.'&Randstr='.$randstr.'&UserIP='.$ip;
//这里aid参数换成你自己的APPID值 ,AppSecretKey参数换成你自己的AppSecretKey值。
$resData = file_get_contents($tagetUrl);//向腾讯服务器发起GET请求
header('Content-type:text/json;charset=utf-8');
$info = json_decode(trim($resData,chr(239).chr(187).chr(191)),true);//去掉BOM头的不可见字符,并转化为数组
if($info["response"] == 1){
  session_start();
  $_SESSION['Login'] = "yes";
  echo('{"allowLogin":"yes"}');
}
else
{
  echo('{"allowLogin":"no"}');
}
?>
至此,接入完成,是不是很简单?
java中创建多线程主要是三种方式,1.继承Thread类,重写run方法 2.实现Runnable接口,重写run方法 3.实现Callable接口,重写call方法。最常用的是前两种,很多书上都提到2方式上的优势,理由是方便实现资源共享,代码和数据的分离,更好体现面向对象思想。实际上,我认为这两种没有太大区别,通过线程同步两者基本没什么差别,看个人习惯而已。
继承方式创建多线程:
public class ThreadDemo{
public static void main(String [] args){
new NewThread().start();
while(true){
System.out.println("main thread is running");
}
}
}
class NewThread extends Thread{
public void run(){
while(true){
System.out.println(Thread.currentThread().getName()+"is running");
}
}
}
Thread(Runnable target)是Thread类的构造方法,Runnable参数为接口类;
public class ThreadMain{
    public static void main(String [] args){
        ThreadRunable runableDemo = new ThreadRunable();
        Thread newThread = new Thread(runableDemo);
        newThread.start();
        while(true){
            System.out.println("main thread is running");
}
}
}
class ThreadRunable implements Runnable{
    public void run(){
        while(true){
            System.out.println(Thread.currentThread().getName()+"is running");
}
}
}
