字形编译引擎(Text Shaping Engine)当今的绝对王者HarfBuzz,拥有极强性能,是字形编译界的Chrome。它有一个hb-subset 子集化模块,算是当前地表最强的字体子集化引擎:
当你给它一段文本(比如 "动态字体子集化")和原字体时,HarfBuzz 会:
自动分析这几个汉字对应的 Glyph ID。
保留这几个字所需的矢量描边数据。
剔除其余上万个未用到的字形数据。
重构并修复 .ttf 文件的 OpenType 内部索引表,确保输出的小字体符合国际标准,能在浏览器中被完美加载。
直观了解:HarfBuzz是做什么的?
官方是这样介绍的:
harfbuzz-world.cc is a single-file build of HarfBuzz that drops into your own C or C++ project without any build-system glue, plus a live playground for it right here in your browser:
harfbuzz-world.cc 提供了一个单文件版的 HarfBuzz(HarfBuzz 整个库整合成一个可以直接编译的 .cc 文件。),可以直接放进你自己的 C/C++ 项目中,无需额外处理构建系统;同时,它还在浏览器中提供了一个可以实时操作的 HarfBuzz 实验场。
shape — the shaped glyph stream as a table, alongside an SVG preview.(字形整形 / 字形塑形)
subset — produce a font subset for the current text and download it.(子集化)
raster — pixel-perfect BGRA rendering at any size, blitted to a canvas.(光栅化/位图化)
vector — the same shaped text rendered to SVG and downloadable PDF.
gpu — slug-based GPU rendering via WebGL2.(GPU 渲染)
官网地址:https://harfbuzz-world.cc/
OpenType(包括排版规则、连字、变形、字形定位表等)也是一套极其复杂的标准规范,而 HarfBuzz 就是这套标准在全世界最权威、最完美的执行引擎(“编译器/解析引擎”)。 很多人以为:计算机显示文本 = 查字典(给一个字符编码,找到对应的字体形状画出来)。 如果全世界只有英文字母(A-Z),这确实很简单。但在现实世界中,文字的显示极其复杂:
—— 复杂连字(Ligatures)与形态变化:阿拉伯文同一个字母,在词首、词中、词尾、单独存在时,形状完全不同,而且必须连笔。印地文/泰文: 辅音和元音组合时,元音符号可能会跑到辅音的上方、下方甚至左边。英文在优雅的排版中,f 和 i 连着写时,f 的横线和 i 的点会融合成一个整体(fi 连字)。
—— 字形(Glyph)与字符(Character)不是一回事。字符(Unicode):是逻辑上的编码(如U+0061代表a)。字形(Glyph):是字体文件(.ttf)中实际绘制出来的矢量图形。一个字符可能对应多个字形,多个字符也可能合成一个字形。
HarfBuzz 的核心工作,这串文本在当前字体下,应该使用字体库里的哪几个字形(Glyph ID)?每个字形应该放在什么坐标位置?字形之间的间距(Kerning)是多少?
说得更直白一些,HarfBuzz就是把字体规则给完美呈现出来,就像浏览器,要把庞大复杂的HTML/CSS/Javascript这些规则给视觉实现,HarfBuzz就是字体界的浏览器。
由于项目需要,我们需要做动态字体子集化,HarfBuzz是不二之选。我们采用的是Python FastAPI + HarfBuzz + Redis+Nginx+Vue3+pdf-lib来搭建。以下的记录是一些操作要点。
第一步:安装系统级依赖与环境
# 1. 更新包索引并安装基础开发工具
sudo dnf update -y
sudo dnf install -y python3 python3-pip python3-devel gcc gcc-c++ make redis

# 2. 启动 Redis 服务并设置为开机自启
sudo systemctl enable --now redis第二步:创建 Python 项目与安装依赖
使用虚拟环境隔离项目依赖:
# 1. 创建项目目录
mkdir -p /opt/font-subset-service
cd /opt/font-subset-service

# 2. 创建并激活虚拟环境
python3 -m venv venv
source venv/bin/activate

# 3. 安装高性能后端框架与 HarfBuzz 绑定库
pip install --upgrade pip
pip install fastapi uvicorn redis uharfbuzz建立隔离的虚拟环境(非常重要): 即便系统中已有 Python,也建议在该项目下单独建一个隔离环境,避免安装的 fastapi、uharfbuzz 与服务器上其他旧项目的依赖包发生冲突:
Bash
python3 -m venv venv
source venv/bin/activate
激活后,命令行开头会出现 (venv),此时使用 pip install 安装的所有包都会独立保存在当前目录下。
uharfbuzz 是 HarfBuzz 的原生 C-extension 绑定,pip install 时会自动在后台调用 C++ 编译器构建,从而直接具备原生的 HarfBuzz 切割能力。
第三步:放置源字体文件
mkdir -p /opt/font-subset-service/fonts
# 将你的 TTF 字体拷贝至此目录:
# /opt/font-subset-service/fonts/NotoSansSC-Regular.ttf第四步:编写 HTTP API 服务核心代码
这里是我们实际Python demo的代码,主要包含字体映射,字符去重,设置Redis缓存,获取处理时间、向客户端发回二进制字体。
import hashlib
import os
import logging
from fastapi import FastAPI, HTTPException, Response
from pydantic import BaseModel
import redis
import uharfbuzz as hb

logging.basicConfig(level=logging.INFO)
logger = logging.getLogger("font-subset-service")

app = FastAPI(title="Dynamic Multi-Font Subsetting Service")

# 1. 初始化 Redis
try:
    r_client = redis.Redis(host='localhost', port=6379, db=0, socket_timeout=2)
    r_client.ping()
except Exception:
    r_client = None

# 2. 根据截图建立完整的字体映射表
FONTS_DIR = "/opt/font-subset-service/fonts"
FONT_MAP = {
    # DM Mono 系列
    "dm-mono-italic": os.path.join(FONTS_DIR, "DMMono-Italic.ttf"),
    "dm-mono-light": os.path.join(FONTS_DIR, "DMMono-Light.ttf"),
    "dm-mono-light-italic": os.path.join(FONTS_DIR, "DMMono-LightItalic.ttf"),
    "dm-mono-medium": os.path.join(FONTS_DIR, "DMMono-Medium.ttf"),
    "dm-mono-medium-italic": os.path.join(FONTS_DIR, "DMMono-MediumItalic.ttf"),
    "dm-mono-regular": os.path.join(FONTS_DIR, "DMMono-Regular.ttf"),

    # Kaushan Script
    "kaushan-script": os.path.join(FONTS_DIR, "KaushanScript-Regular.ttf"),

    # Noto Sans SC (简体中文)
    "noto-sans-sc-black": os.path.join(FONTS_DIR, "NotoSansSC-Black.ttf"),
    "noto-sans-sc-bold": os.path.join(FONTS_DIR, "NotoSansSC-Bold.ttf"),
    "noto-sans-sc-extrabold": os.path.join(FONTS_DIR, "NotoSansSC-ExtraBold.ttf"),
    "noto-sans-sc-extralight": os.path.join(FONTS_DIR, "NotoSansSC-ExtraLight.ttf"),
    "noto-sans-sc-light": os.path.join(FONTS_DIR, "NotoSansSC-Light.ttf"),
    "noto-sans-sc-medium": os.path.join(FONTS_DIR, "NotoSansSC-Medium.ttf"),
    "noto-sans-sc-regular": os.path.join(FONTS_DIR, "NotoSansSC-Regular.ttf"),
    "noto-sans-sc-semibold": os.path.join(FONTS_DIR, "NotoSansSC-SemiBold.ttf"),
    "noto-sans-sc-thin": os.path.join(FONTS_DIR, "NotoSansSC-Thin.ttf"),

    # Noto Sans TC (繁体中文)
    "noto-sans-tc-black": os.path.join(FONTS_DIR, "NotoSansTC-Black.ttf"),
    "noto-sans-tc-bold": os.path.join(FONTS_DIR, "NotoSansTC-Bold.ttf"),
    "noto-sans-tc-extrabold": os.path.join(FONTS_DIR, "NotoSansTC-ExtraBold.ttf"),
    "noto-sans-tc-extralight": os.path.join(FONTS_DIR, "NotoSansTC-ExtraLight.ttf"),
    "noto-sans-tc-light": os.path.join(FONTS_DIR, "NotoSansTC-Light.ttf"),
    "noto-sans-tc-medium": os.path.join(FONTS_DIR, "NotoSansTC-Medium.ttf"),
    "noto-sans-tc-regular": os.path.join(FONTS_DIR, "NotoSansTC-Regular.ttf"),
    "noto-sans-tc-semibold": os.path.join(FONTS_DIR, "NotoSansTC-SemiBold.ttf"),
    "noto-sans-tc-thin": os.path.join(FONTS_DIR, "NotoSansTC-Thin.ttf"),
}

# 3. 预加载字体到内存
LOADED_FONTS = {}
for name, path in FONT_MAP.items():
    if os.path.exists(path):
        with open(path, "rb") as f:
            bytes_data = f.read()
            blob = hb.Blob(bytes_data)
            face = hb.Face(blob)
            LOADED_FONTS[name] = face
            logger.info(f"Loaded font: {name}")
    else:
        logger.warning(f"Font file missing for '{name}' at {path}")

class FontRequest(BaseModel):
    text: str
    font_name: str = "noto-sans-sc-regular"

@app.post("/api/font/subset")
def get_font_subset(req: FontRequest):
    if not req.text or not req.text.strip():
        raise HTTPException(status_code=400, detail="Text cannot be empty")

    if req.font_name not in LOADED_FONTS:
        raise HTTPException(
            status_code=404,
            detail=f"Font '{req.font_name}' not supported. Available: {list(LOADED_FONTS.keys())}"
        )

    target_face = LOADED_FONTS[req.font_name]

    chars = set(req.text + " \n\r\t")
    sorted_chars = "".join(sorted(chars))

    cache_key_raw = f"{req.font_name}:{sorted_chars}"
    cache_key = f"font_subset:{hashlib.md5(cache_key_raw.encode('utf-8')).hexdigest()}"

    if r_client:
        try:
            cached_bytes = r_client.get(cache_key)
            if cached_bytes:
                return Response(content=cached_bytes, media_type="font/ttf", headers={"X-Cache": "HIT"})
        except Exception as e:
            logger.error(f"Redis read error: {e}")

    try:
        input_obj = hb.SubsetInput()
        unicodes = input_obj.unicode_set
        for char in sorted_chars:
            unicodes.add(ord(char))

        subset_face = hb.subset(target_face, input_obj)
        if not subset_face:
            raise HTTPException(status_code=500, detail="HarfBuzz subsetting failed")

        subset_bytes = bytes(subset_face.blob.data)

    except Exception as e:
        logger.error(f"Subsetting failed: {e}")
        raise HTTPException(status_code=500, detail=f"Font processing error: {str(e)}")

    if r_client:
        try:
            r_client.setex(cache_key, 604800, subset_bytes)
        except Exception as e:
            logger.error(f"Redis write error: {e}")

return Response(content=subset_bytes, media_type="font/ttf", headers={"X-Cache": "MISS"})第五步:使用 Systemd 托管后台服务
使用 Systemd 确保服务挂掉后自动重启,开机自启。
创建文件:
/etc/systemd/system/font-service.service
[Unit]
Description=HarfBuzz Dynamic Font Subsetting Service
After=network.target redis.service

[Service]
Type=simple
User=root
WorkingDirectory=/opt/font-subset-service
ExecStart=/opt/font-subset-service/venv/bin/uvicorn main:app --host 127.0.0.1 --port 8000 --workers 4
Restart=always
RestartSec=3

[Install]
WantedBy=multi-user.target启动服务并查看状态:
# 重载系统服务
sudo systemctl daemon-reload
# 启动并设置开机自启
sudo systemctl enable --now font-service
# 查看运行状态
sudo systemctl status font-service第六步:配置 Nginx 反向代理与防火墙
设置指向本地subset服务,并开启gzip压缩、跨域准许、SSL等。
server
{
    listen 80;
    listen 443 ssl;
    listen 443 quic;
    listen [::]:443 ssl;
    listen [::]:443 quic;
    http2 on;
    listen [::]:80;
    server_name font.xiaobage.cc;
    index main.py index.py index.html index.htm index.php default.php default.htm default.html;
    root /www/wwwroot/font.xiaobage.cc;

    #CERT-APPLY-CHECK--START
    # 用于SSL证书申请时的文件验证相关配置 -- 请勿删除
    include /www/server/panel/vhost/nginx/well-known/font.xiaobage.cc.conf;
    #CERT-APPLY-CHECK--END
    include /www/server/panel/vhost/nginx/extension/font.xiaobage.cc/*.conf;

    #SSL-START SSL相关配置,请勿删除或修改下一行带注释的404规则
    #error_page 404/404.html;
    #..........
    #SSL-END

    #ERROR-PAGE-START  错误页配置,可以注释、删除或修改
    error_page 404 /404.html;
    #error_page 502 /502.html;
    #ERROR-PAGE-END

    #PHP-INFO-START  PHP引用配置,可以注释或修改
    include enable-php-83.conf;
    #PHP-INFO-END

    #REWRITE-START URL重写规则引用,修改后将导致面板设置的伪静态规则失效
    include /www/server/panel/vhost/rewrite/font.xiaobage.cc.conf;
    #REWRITE-END

   # ====================【新增:字体服务反向代理配置】====================
    location /api/font/ {
        proxy_pass http://127.0.0.1:8000;

        # 传递真实请求头与 HTTPS 协议标识
        proxy_set_header Host $host;
        proxy_set_header X-Real-IP $remote_addr;
        proxy_set_header X-Forwarded-For $proxy_add_x_forwarded_for;
        proxy_set_header X-Forwarded-Proto $scheme;

        # 跨域配置 (CORS) - 允许前端网页跨域调用
        add_header 'Access-Control-Allow-Origin' '*' always;
        add_header 'Access-Control-Allow-Methods' 'GET, POST, OPTIONS' always;
        add_header 'Access-Control-Allow-Headers' 'DNT,User-Agent,X-Requested-With,If-Modified-Since,Cache-Control,Content-Type,Range,Authorization' always;
        add_header 'Access-Control-Expose-Headers' 'Content-Length,Content-Range,X-Cache' always;

        # ------------------- 【重点:Gzip 动态压缩设置】 -------------------
        gzip on;
        gzip_min_length 1k;     # 只有大于 1KB 的字体才压缩
        gzip_comp_level 6;       # 压缩级别 (1-9),6 是性价比最高的值
        gzip_types font/ttf font/opentype application/x-font-ttf font/woff2;
        # 【非常重要】让代理服务返回的数据也能触发 gzip 压缩
        gzip_proxied any;
        # ------------------------------------------------------------------

        # OPTIONS 预检请求极速响应
        if ($request_method = 'OPTIONS') {
            add_header 'Access-Control-Allow-Origin' '*';
            add_header 'Access-Control-Allow-Methods' 'GET, POST, OPTIONS';
            add_header 'Access-Control-Allow-Headers' 'DNT,User-Agent,X-Requested-With,If-Modified-Since,Cache-Control,Content-Type,Range,Authorization';
            add_header 'Access-Control-Max-Age' 1728000;
            add_header 'Content-Type' 'text/plain; charset=utf-8';
            add_header 'Content-Length' 0;
            return 204;
        }
    }


    #禁止在证书验证目录放入敏感文件
    if ( $uri ~ "^/\.well-known/.*\.(php|jsp|py|js|css|lua|ts|go|zip|tar\.gz|rar|7z|sql|bak)$" ) {
        return 403;
    }

    location ~ .*\.(gif|jpg|jpeg|png|bmp|swf)$
    {
        expires      30d;
        error_log /dev/null;
        access_log /dev/null;
    }

    location ~ .*\.(js|css)?$
    {
        expires      12h;
        error_log /dev/null;
        access_log /dev/null;
    }
}第七步:创建前端demo测试页
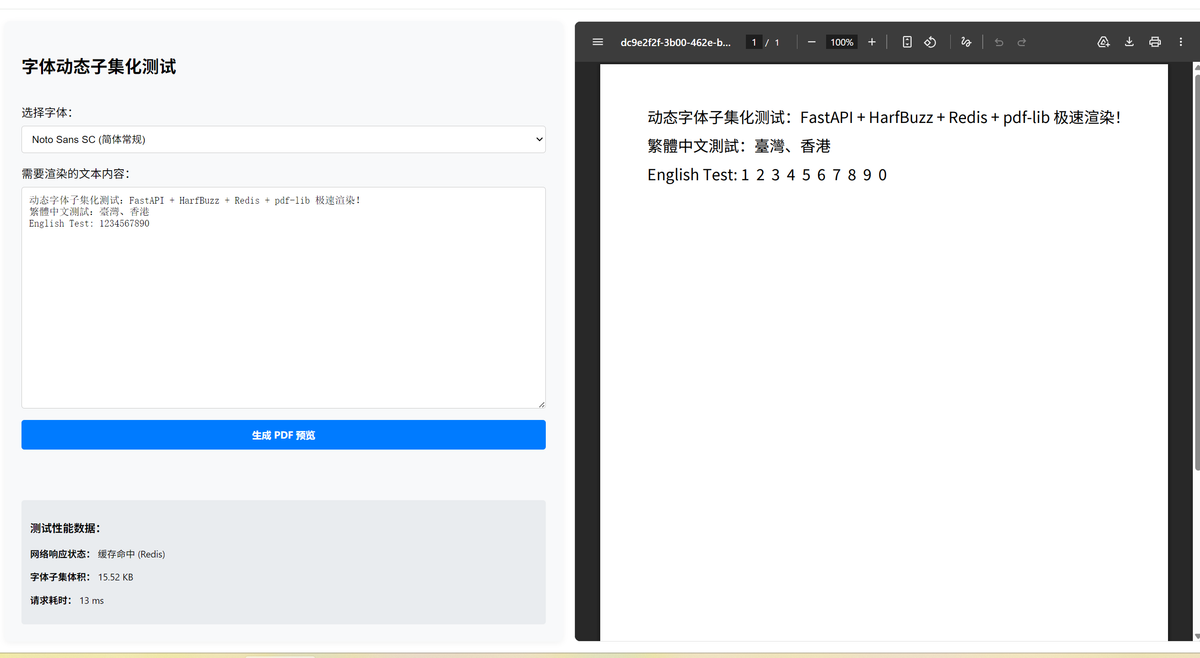
这里使用的vue3+pdf-lib框架做前端架构,页面通过fetch向服务器发送文本,请求这些文本的字体子集,并使用该字体绘制PDF文档。
  <!-- /FontSubsetDemo.vue -->
<template>
  <div class="demo-container">
    <!-- 左侧控制面板 -->
    <div class="control-panel">
      <h2>字体动态子集化测试</h2>

      <div class="form-group">
        <label>选择字体:</label>
        <select v-model="selectedFont">
          <option v-for="font in fontOptions" :key="font.value" :value="font.value">
            {{ font.label }}
          </option>
        </select>
      </div>

      <div class="form-group">
        <label>需要渲染的文本内容:</label>
        <textarea
          v-model="inputText"
          rows="6"
          placeholder="输入你需要显示在 PDF 里的中文、繁体或英文..."
        ></textarea>
      </div>

      <button :disabled="loading" @click="generatePdf">
        {{ loading ? '正在请求子集化并生成 PDF...' : '生成 PDF 预览' }}
      </button>

      <!-- 信息指示指标 -->
      <div v-if="metrics.subsetSize" class="metrics-card">
        <h3>测试性能数据:</h3>
        <p><strong>网络响应状态:</strong> {{ metrics.cacheStatus }}</p>
        <p><strong>字体子集体积:</strong> {{ metrics.subsetSize }} KB</p>
        <p><strong>请求耗时:</strong> {{ metrics.timeCost }} ms</p>
      </div>
    </div>

    <!-- 右侧 PDF 实时预览面板 -->
    <div class="preview-panel">
      <iframe v-if="pdfUrl" :src="pdfUrl" class="pdf-frame"></iframe>
      <div v-else class="placeholder">点击左侧生成按钮以预览 PDF</div>
    </div>
  </div>
</template>

<script setup>
import { ref } from 'vue';
import { PDFDocument } from 'pdf-lib';
import fontkit from '@pdf-lib/fontkit';

// 页面响应式数据
const inputText = ref('动态字体子集化测试:FastAPI + HarfBuzz + Redis + pdf-lib 极速渲染!\n繁體中文測試:臺灣、香港\nEnglish Test: 1234567890');
const selectedFont = ref('noto-sans-sc-regular');
const loading = ref(false);
const pdfUrl = ref('');

const metrics = ref({
  subsetSize: 0,
  timeCost: 0,
  cacheStatus: '',
});

// 可选字体字典
const fontOptions = [
  { label: 'Noto Sans SC (简体常规)', value: 'noto-sans-sc-regular' },
  { label: 'Noto Sans SC (简体粗体)', value: 'noto-sans-sc-bold' },
  { label: 'Noto Sans SC (简体极细)', value: 'noto-sans-sc-thin' },
  { label: 'Noto Sans TC (繁体常规)', value: 'noto-sans-tc-regular' },
  { label: 'Noto Sans TC (繁体粗体)', value: 'noto-sans-tc-bold' },
  { label: 'DM Mono Regular (等宽英文)', value: 'dm-mono-regular' },
  { label: 'DM Mono Italic (等宽斜体)', value: 'dm-mono-italic' },
  { label: 'Kaushan Script (艺术英文)', value: 'kaushan-script' },
];

const generatePdf = async () => {
  if (!inputText.value.trim()) return alert('请输入文本');

  loading.value = true;
  const startTime = performance.now();

  try {
    // 1. 发起 POST 请求调用后端子集化服务
    const response = await fetch('https://font.xiaobage.cc/api/font/subset', {
      method: 'POST',
      headers: { 'Content-Type': 'application/json' },
      body: JSON.stringify({
        text: inputText.value,
        font_name: selectedFont.value,
      }),
    });

    if (!response.ok) {
      throw new Error(`字体获取失败: ${await response.text()}`);
    }

    // 记录测试指标
    const cacheHeader = response.headers.get('X-Cache') || 'MISS';
    const fontArrayBuffer = await response.arrayBuffer();

    metrics.value.subsetSize = (fontArrayBuffer.byteLength / 1024).toFixed(2);
    metrics.value.cacheStatus = cacheHeader === 'HIT' ? '缓存命中 (Redis)' : '实时生成 (HarfBuzz)';
    metrics.value.timeCost = (performance.now() - startTime).toFixed(0);

    // 2. 利用 PDF-Lib 创建 PDF
    const pdfDoc = await PDFDocument.create();
    pdfDoc.registerFontkit(fontkit);

    // 嵌入动态生成的字体子集
    const customFont = await pdfDoc.embedFont(fontArrayBuffer);

    // 3. 绘制文字到 PDF 页面
    const page = pdfDoc.addPage([595.28, 841.89]); // A4 尺寸 (pt)
    const lines = inputText.value.split('\n');

    let currentY = 780;
    for (const line of lines) {
      if (line.trim()) {
        page.drawText(line, {
          x: 50,
          y: currentY,
          size: 16,
          font: customFont,
        });
      }
      currentY -= 30;
    }

    // 4. 导出 PDF 流并绑定到 iframe 预览
    const pdfBytes = await pdfDoc.save();
    const blob = new Blob([pdfBytes], { type: 'application/pdf' });

    if (pdfUrl.value) URL.revokeObjectURL(pdfUrl.value);
    pdfUrl.value = URL.createObjectURL(blob);
  } catch (err) {
    alert(`错误: ${err.message}`);
  } finally {
    loading.value = false;
  }
};
</script>

<style scoped>
.demo-container {
  display: flex;
  height: 100vh;
  gap: 16px;
  padding: 16px;
  box-sizing: border-box;
  font-family: -apple-system, BlinkMacSystemFont, "Segoe UI", Roboto, sans-serif;
}

.control-panel {
  flex: 1;
  display: flex;
  flex-direction: column;
  gap: 16px;
  background: #f8f9fa;
  padding: 24px;
  border-radius: 8px;
  box-shadow: 0 2px 8px rgba(0,0,0,0.05);
}

.form-group {
  display: flex;
  flex-direction: column;
  gap: 8px;
}

select, textarea {
  padding: 10px;
  border: 1px solid #ccc;
  border-radius: 4px;
  font-size: 14px;
}

button {
  padding: 12px;
  background-color: #007bff;
  color: white;
  border: none;
  border-radius: 4px;
  cursor: pointer;
  font-weight: bold;
}

button:disabled {
  background-color: #6c757d;
  cursor: not-allowed;
}

.metrics-card {
  margin-top: auto;
  padding: 12px;
  background-color: #e9ecef;
  border-radius: 4px;
  font-size: 13px;
}

.preview-panel {
  flex: 1.2;
  border: 1px solid #e0e0e0;
  border-radius: 8px;
  overflow: hidden;
  background: #525659;
}

.pdf-frame {
  width: 100%;
  height: 100%;
  border: none;
}

.placeholder {
  display: flex;
  align-items: center;
  justify-content: center;
  height: 100%;
  color: #a0a0a0;
}
</style>运行/FontSubsetDemo,我们想要的效果终于出现,完美实现了原生20MB+的字体,只有10K+,极致按需瘦身。而且,请求耗时在Redis缓存命中的情况下仅10ms+,可以说表现非常优秀了!
Demo在线演示地址:https://www.xiaobage.cc/FontSubsetDemo